
30 August 2026
How to Measure Walls & Cladding From Plans: Complete Takeoff Guide

By Shaun, Founder of QuoteCore+. Reviewed 30 August 2026.
You have a set of plans - floor plans and elevations - and you need wall and cladding measurements from them. This guide shows the complete process: which drawings to use, how to check the scale, how to measure rectangular walls, gables and irregular shapes, how to deduct openings, and how to keep different materials separate. Everything here can be done with the Free Wall & Cladding Takeoff Tool - no printing, no scale ruler, no signup.
What is a wall & cladding takeoff?
A takeoff is the process of pulling measurements off a drawing so you can calculate quantities. For walls and cladding that means wall areas (gross and net), linear items like trims, battens and flashings, and opening counts. Those measurements feed everything downstream: material orders, labour estimates and the final quote.
The traditional way is a printed plan, a scale ruler and a calculator - repeated for every elevation and every revision. The digital way is the same logic done on screen: calibrate the scale once, trace each wall, let the tool do the arithmetic.
Which drawings do you need?
- Elevations - the most important drawings for cladding. Each elevation shows one face of the building as a flat surface: exactly what you trace for cladding areas, trims and openings.
- Floor plans - wall lengths, internal wall areas, and partition runs.
- Sections - cavity construction, batten spacing, material build-ups.
- Window and door schedules - opening sizes and counts to cross-check your deductions.
If your plans are PDFs, upload them directly - the free Wall & Cladding Takeoff Tool accepts multi-page PDFs up to 50 MB and you pick the page you need. As long as the sheet isn’t cropped or stretched, scale is preserved exactly.
Step 1: Check the scale
Before measuring anything, verify the drawing scale. Find a dimensioned length on the drawing - a wall the architect has labelled, or a standard door width. Measure it with your calibrated tool and confirm it matches. If it doesn’t, your calibration is wrong and every number after it will be wrong too. Thirty seconds here saves a whole takeoff.
Working at 1/4" = 1'-0" scale (worked example)
1/4" = 1'-0" is the scale most commonly used on residential floor plans: every 1/4 inch on the paper represents 1 foot of the building. That is a scale factor of 1:48 - 48 quarter-inches per foot - so 1 inch on paper equals 4 feet on site. Metric plans work the same way at the near-equivalent 1:50 scale.
| On paper | Real world |
|---|---|
| 1/4" | 1 ft |
| 1/2" | 2 ft |
| 1" | 4 ft |
| 2" | 8 ft |
| 6" | 24 ft |
| 12" | 48 ft |
Worked example: a bedroom wall measures 2 3/8" on paper. Multiply by the factor of 4 to get feet: 2.375 × 4 = 9.5 ft. At an 8 ft ceiling, one face of that wall is 9.5 × 8 = 76 ft². One multiplication is the whole conversion.
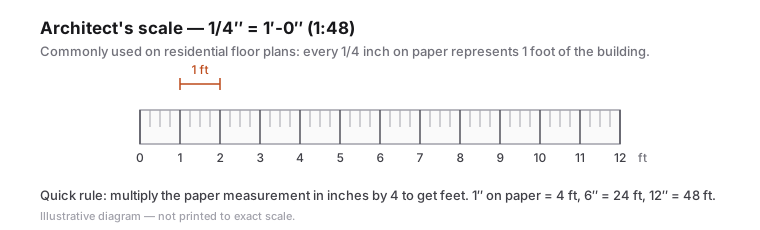
A calibrated digital takeoff applies the scale for you - measure once on screen and read real lengths directly instead of converting each dimension. The same calibration-first workflow runs through roofing takeoff software.
Step 2: Measure rectangular walls
For each elevation, trace the full wall rectangle: width × height gives the gross wall area. Do all four elevations (and any gable ends) before moving on, so you have the complete gross envelope recorded and named.
Step 3: Gables and irregular walls
Gables, raked walls and stepped or angled elevations are polygons, not rectangles. Trace each vertex around the shape and the tool computes the area directly - no splitting into triangles, no ½ × base × height by hand. Curved façades can be approximated with a series of short segments.
Step 4: Deduct openings
Windows and doors don’t get cladding. Trace each opening (or measure one of each size and multiply by the schedule count) and subtract them from the gross area to get the net wall area:
Net wall area = gross wall area − sum of openings
Keep both numbers. Cladding and sheet materials order from net area; paint and render often price from gross because you still coat the reveals.
Step 5: Separate materials
Real elevations mix materials - brick to one level, weatherboard above, a feature panel at the entry. Trace each material zone separately and name it. Your output then totals each material cleanly, which is what your supplier needs.
For a full material-by-material walkthrough - timber, fibre cement, composite, metal and panelised systems, plus trims and waste - see how to do a cladding takeoff.
Step 6: Measure linear items
Trims, battens, flashings and cladding runs are lengths, not areas. Measure the perimeter of each opening for window/door trims, the vertical runs for cavity battens, and internal / external corners for corner trims. In the tool, draw these as line measurements against a linear component.
How to take off interior walls from floor plans
Interior wall takeoff is the same discipline applied to floor plans instead of elevations: measure partition wall lengths by type, then convert them to areas and board quantities. The wall schedule or plan legend tags each partition type (for example 90 mm stud vs 70 mm partition) - measure and total each type separately, because they order and price differently.
- Run a linear measurement along every partition run, grouping totals by wall type.
- Multiply each type’s total length by the floor-to-ceiling height for one face.
- Drywall and paint cover both faces - double the net area.
- Deduct door openings within the partitions (count them from the door schedule; a typical interior door is 0.9 × 2.1 m).
- Add 5–10% waste for cuts, breaks and defects before ordering board.
The differences vs exterior takeoff: interior walls deduct doors rather than windows, carry no cladding, corners or flashings, studs are counted per run, and finishes cover both faces instead of one.
Worked example: a two-bedroom apartment has 18.0 m of 90 mm stud partitions at a 2.4 m ceiling. One face: 18.0 × 2.4 = 43.2 m². Three doors at 0.9 × 2.1 m = 5.67 m², so net per face = 37.53 m². Both faces: 75.06 m². At 7.5% waste, order ≈ 81 m² of board.
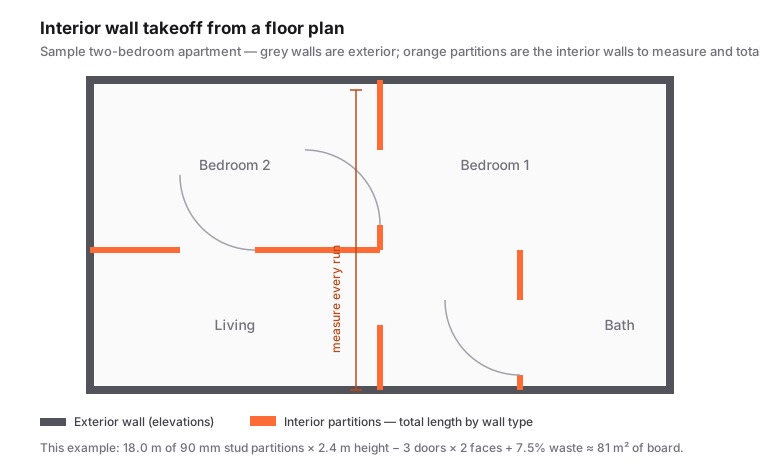
You can measure partition runs and areas on screen with the Free Wall & Cladding Takeoff Tool - it handles line measurements as well as areas - or browse the full set of free tools.
Worked example: a two-storey house
Front elevation 9.0 m wide × 5.4 m tall to the eaves, plus a 9.0 m wide × 1.8 m gable. Openings: a 2.4 × 2.1 m garage door, a front door 0.9 × 2.1 m and four windows totalling 7.2 m².
- Gross rectangle: 9.0 × 5.4 = 48.6 m²
- Gable: 9.0 × 1.8 ÷ 2 = 8.1 m²
- Gross elevation total: 56.7 m²
- Openings: (2.4 × 2.1) + (0.9 × 2.1) + 7.2 = 13.65 m²
- Net cladding area: 56.7 − 13.65 = 43.05 m² (before waste)
Repeat for the other three elevations and you have the full house. The same building carries through our cladding takeoff guide so you can follow the quantities end to end.
Digital method vs scale ruler
The manual method works, but it’s slow, error-prone and has to be redone for every revision. A digital takeoff on the same drawing takes minutes, recalculates instantly when you fix a trace, and hands clean totals straight into pricing. The same argument applies to roofs - see manual vs digital roof takeoff - and whether measuring beats visiting site is covered in quoting from plans vs site visits.
Reading level changes in plans: step-ups, step-downs and thresholds
Level changes are shown with direction arrows and height markers, not 3D shapes. A step or stair is drawn with treads and a direction arrow labelled UP or DN - the arrow starts at the bottom riser and points in the direction of travel - usually annotated with the number of risers, e.g. UP 2R for a two-riser step or UP 14R for a full flight. The same flight appears as UP on the lower floor plan and DN on the upper one.
Exact heights come from elevation markers: small circles or crosses carrying a level value such as +0.300, meaning 300 mm above the floor datum. At doorways between levels, the threshold - the break in the wall line at the door opening - marks where the level changes and where threshold trim will sit.
What to measure: riser count × riser height gives total rise; note the direction of travel (which side steps up); and take threshold widths from the door schedule for trims. Worked example: a doorway marked UP 2R beside a +0.300 elevation with a 0.9 m door on the schedule - two risers × 150 mm = 300 mm step up, matching the +0.300 marker, with a 0.9 m threshold to trim.
Common mistakes
- Skipping the scale check - one bad calibration ruins everything downstream.
- Forgetting the gables - the most missed area on masonry and weatherboard homes.
- Deducting openings from the wrong baseline - decide gross vs net per material up front.
- Ignoring waste - cladding typically needs 5 - 10% extra; add it at the ordering stage, not after.
- Mixing units - measure everything metric or everything imperial, never both.
Other uses for the same measurements
The same wall areas drive paint, render, insulation and membrane quantities. Once the walls are traced, you can reuse the takeoff for almost any surface material - including inside the building for drywall and sheet materials.
From measurements to quote
Once you have your wall and cladding measurements, turn them into a priced quote with reusable components - or start measuring now with the Free Wall & Cladding Takeoff Tool.
FAQ
How do I measure wall areas from plans?
Calibrate the drawing scale from a known dimension, trace each wall or elevation as a polygon to get gross area, then trace windows and doors and subtract them for net area. A free tool like the QuoteCore+ Wall & Cladding Takeoff does the arithmetic on screen.
How do I calculate cladding area from a drawing?
Measure the gross wall area per elevation (including gables), deduct all window and door openings to get net area, then add your waste allowance (typically 5-10%) at the ordering stage.
Do I include gables in wall area?
Yes. Gables are cladding area. Calculate each gable as half base times height, or trace it as a triangle in a takeoff tool. Gables are the most commonly forgotten area in wall takeoffs.
Should cladding be ordered from gross or net wall area?
Net. Cladding only covers wall area minus openings, so order from net area plus waste. Paint and render are often priced from gross area because reveals still get coated.
What drawings do I need for a wall takeoff?
Elevations are the key drawings for cladding, plus floor plans for wall lengths, sections for build-ups, and the window/door schedule to cross-check opening deductions.
Can I measure plans digitally for free?
Yes. The QuoteCore+ Free Wall & Cladding Takeoff Tool lets you upload a plan image, calibrate the scale and trace wall areas, trims and openings free, with no signup.
How do I handle multiple cladding materials on one elevation?
Trace each material zone as its own area and name it (e.g. brick lower, weatherboard upper). Your takeoff then totals each material separately, which is what suppliers need for ordering.
What is the difference between gross and net wall area?
Gross wall area is the full elevation as drawn (width x height plus gables). Net wall area subtracts windows, doors and other openings. Keep both numbers - different materials use different baselines.
How do you take off interior walls from architectural drawings?
Find each wall type in the plan’s legend or wall schedule, measure the length of every run and total it per type, multiply by floor-to-ceiling height, deduct door openings, then add 5–10% waste. Drywall and paint need both faces, so double the net area before ordering board.
How do you measure walls at 1/4" scale?
At 1/4" = 1'-0" scale, every 1/4 inch on paper is 1 foot on the building - a 1:48 factor. Multiply the paper measurement in inches by 4 to get feet: a wall measuring 2 3/8" on paper is 9.5 ft (2.375 × 4), or 76 ft² of face at an 8 ft height.
How do you show a step up or level change on a floor plan?
With a direction arrow labelled UP or DN along the drawn treads, annotated with the riser count (e.g. UP 2R), plus an elevation marker giving the height at that point (e.g. +0.300 = 300 mm). Multiply riser count by riser height for the total rise, and take threshold widths from the door schedule for trims.
Ready to quote faster?